Archive for the ‘News’ Category
If you actually believe the shiny marketing brochures handed out in pristine model homes, your new Texas subdivision is a sanctuary of precision engineering and artisanal craftsmanship. If you step into your attic or look behind your outdoor condensing unit with half a brain, however, you will quickly realize that corporate builders view modern building codes not as life-safety minimums, but as personal financial slights. Nowhere is this corporate spite more hazardous to your health and bank account than in how high-volume builders are botching the mandatory federal transition from legacy R-410A to low-GWP A2L refrigerants like R-454B and R-32.
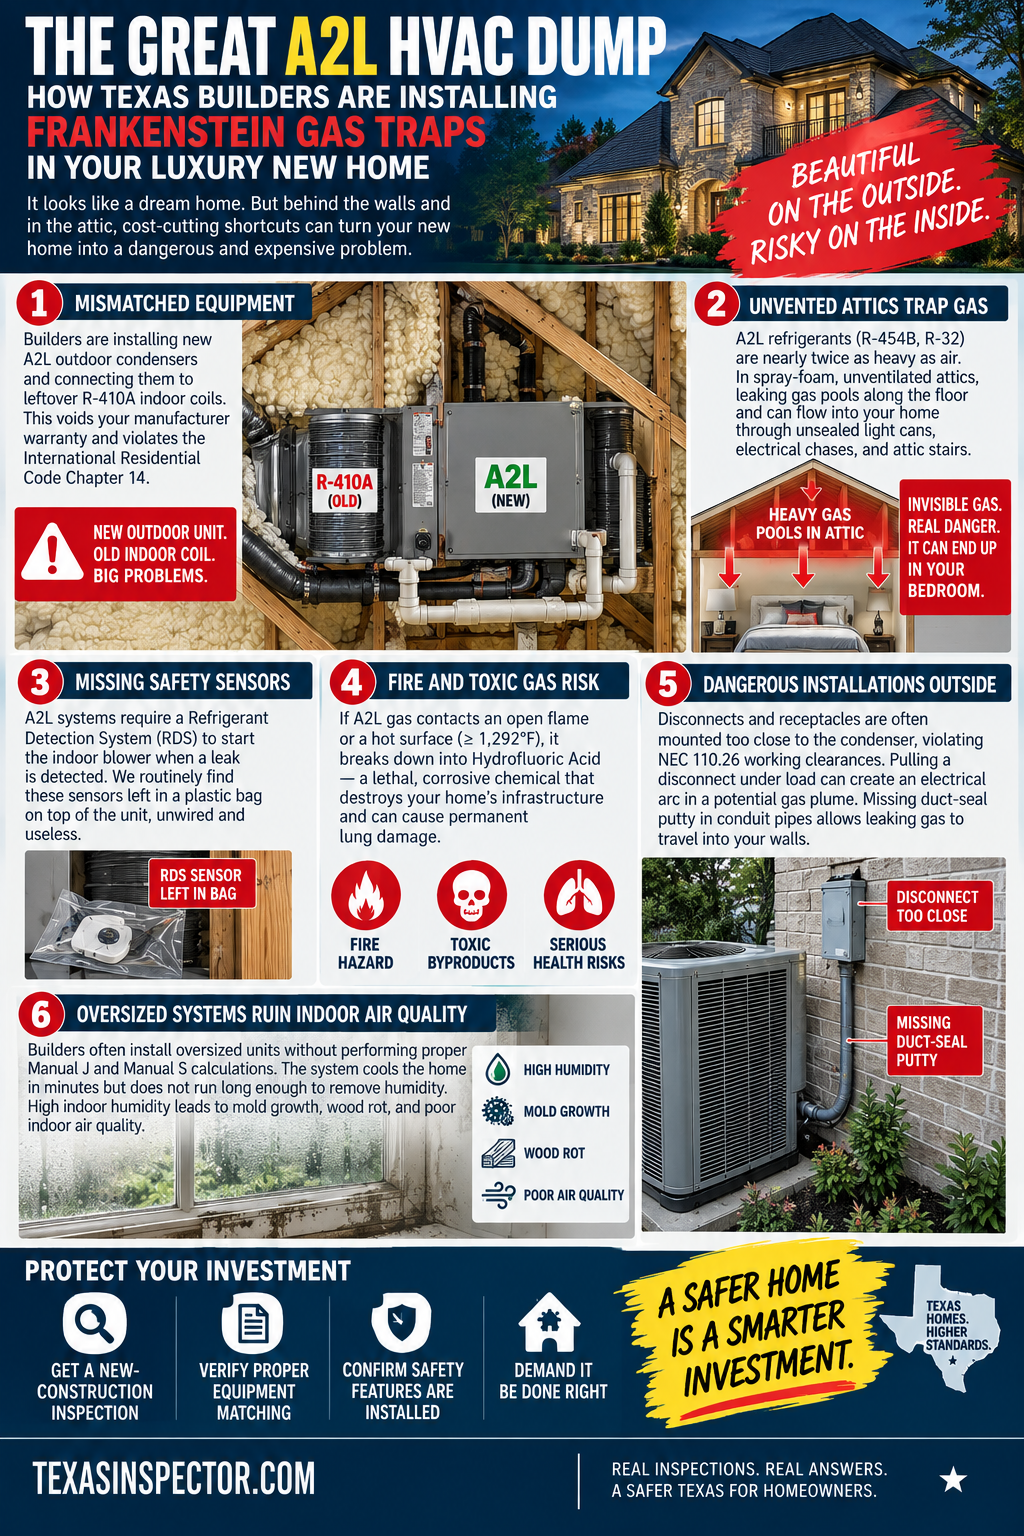
Federal bureaucrats envisioned the shift to A2L refrigerants as a clean step toward environmental salvation. Texas volume builders and the bargain-bin HVAC subcontractors they hired off a job board saw it as a terrifying, fire-sale panic over obsolete equipment. To avoid taking a financial loss on outdated inventory, builders across the state have turned half-million-dollar houses into glorified parts dumps. We routinely document Frankenstein mechanical setups where a brand-new A2L outdoor condenser is recklessly wired to a leftover, completely incompatible R-410A indoor coil hidden up in the attic. This penny-pinching trick voids your equipment warranty before the drywall dust settles, violates International Residential Code Chapter 14, and leaves you paying off an uncertified appliance for the duration of your thirty-year mortgage.
What makes this liquidation game truly special is the physical behavior of these new A2L gases. The industry delicately refers to them as mildly flammable, but in the real world, they are nearly twice as heavy as air, behaving almost identically to leaking propane. In modern Texas builds, where sales reps love to brag in their model homes about spray-foam-encapsulated, unventilated attics, a leaking coil becomes an invisible trap. The heavy gas cannot passively escape through non-existent soffit vents; it pools along the attic deck in concentrated, suffocating lakes. When lazy construction crews inevitably skip basic energy-code air-sealing around ceiling penetrations, that heavy gas follows gravity directly into your home, cascading through unsealed recessed light cans and wire chases to quietly fill your master bedroom while you sleep.
Building safety codes mandate that these units feature factory-installed Refrigerant Detection Systems designed to forcibly kick on the main indoor blower the second a leak occurs, whipping the floor-level gas up and diluting it throughout the entire house. Yet, during our inspections, we routinely find these life-saving sensors sitting in a clear plastic bag on top of the air handler, completely unwired because reading an installation manual is apparently asking too much. This laziness turns downright lethal when the builder crams that unvented air handler into an attic right next to an atmospheric gas water heater with an open flame. If leaking A2L gas contacts an open pilot light or a hot surface exceeding 1,292 degrees Fahrenheit, it does not just catch fire; it thermally decomposes into Hydrofluoric Acid, a hyper-corrosive chemical weapon that destroys your home’s infrastructure and causes permanent lung damage.
Step outside into the yard, and the careless hazards continue. Incompetent electrical crews regularly slap unsealed disconnect boxes and standard wall receptacles inches away from the outdoor condenser’s high-pressure service ports, violating National Electrical Code Section 110.26 working clearances and UL safety rules. Pulling an electrical plug or throwing an unsealed disconnect switch under load creates an electrical arc directly inside the potential gas plume of an outdoor leak, creating an instant flash-fire hazard. Worse yet, because lazy installers routinely forget to put duct-seal putty inside the conduit pipes, heavy leaking gas uses the hollow electrical pipe as a private highway, draining heavy refrigerant directly into your wall cavity.
Even if your builder accidentally manages not to set your house on fire or poison the air, they will almost certainly ruin your indoor humidity. Calculating proper HVAC sizing using region-specific Manual J and Manual S engineering load math is treated as a mythical fairytale inside model home sales offices. Subcontractors simply throw in oversized units to avoid hot-call complaints. An oversized A2L system cools your home in eight lightning-fast minutes and shuts off before extracting a single drop of moisture from the air. Your thermostat reads seventy degrees, but your indoor relative humidity quietly spikes past sixty-five percent. Within months, your luxury home turns into an artisanal mold farm where luxury vinyl floors buckle, ductwork sweats through the drywall, and black mold colonizes the dark cavities behind your baseboards.
Do not rely on municipal inspectors who spend four minutes on site, and certainly do not trust the builder’s smooth-talking warranty representative who tells you that moldy baseboards and sweating vents are simply part of a new home settling. Before you sign closing papers or let your 11-month builder warranty expire, insist on an independent inspection by an ICC R5 inspector. An ICC R5 Combination Residential Inspector possesses certified, multi-discipline mastery across building structural, mechanical, electrical, and plumbing codes. They are uniquely qualified to audit AHRI component matching, detect unsealed electrical arcing hazards within three feet of fuel sources, verify active RDS safety interlocks, and use thermal imaging to expose the latent envelope failures builders try to hide. Your health, your family’s safety, and your life savings depend on catching these Frankenstein systems before the builder skips town with your money.
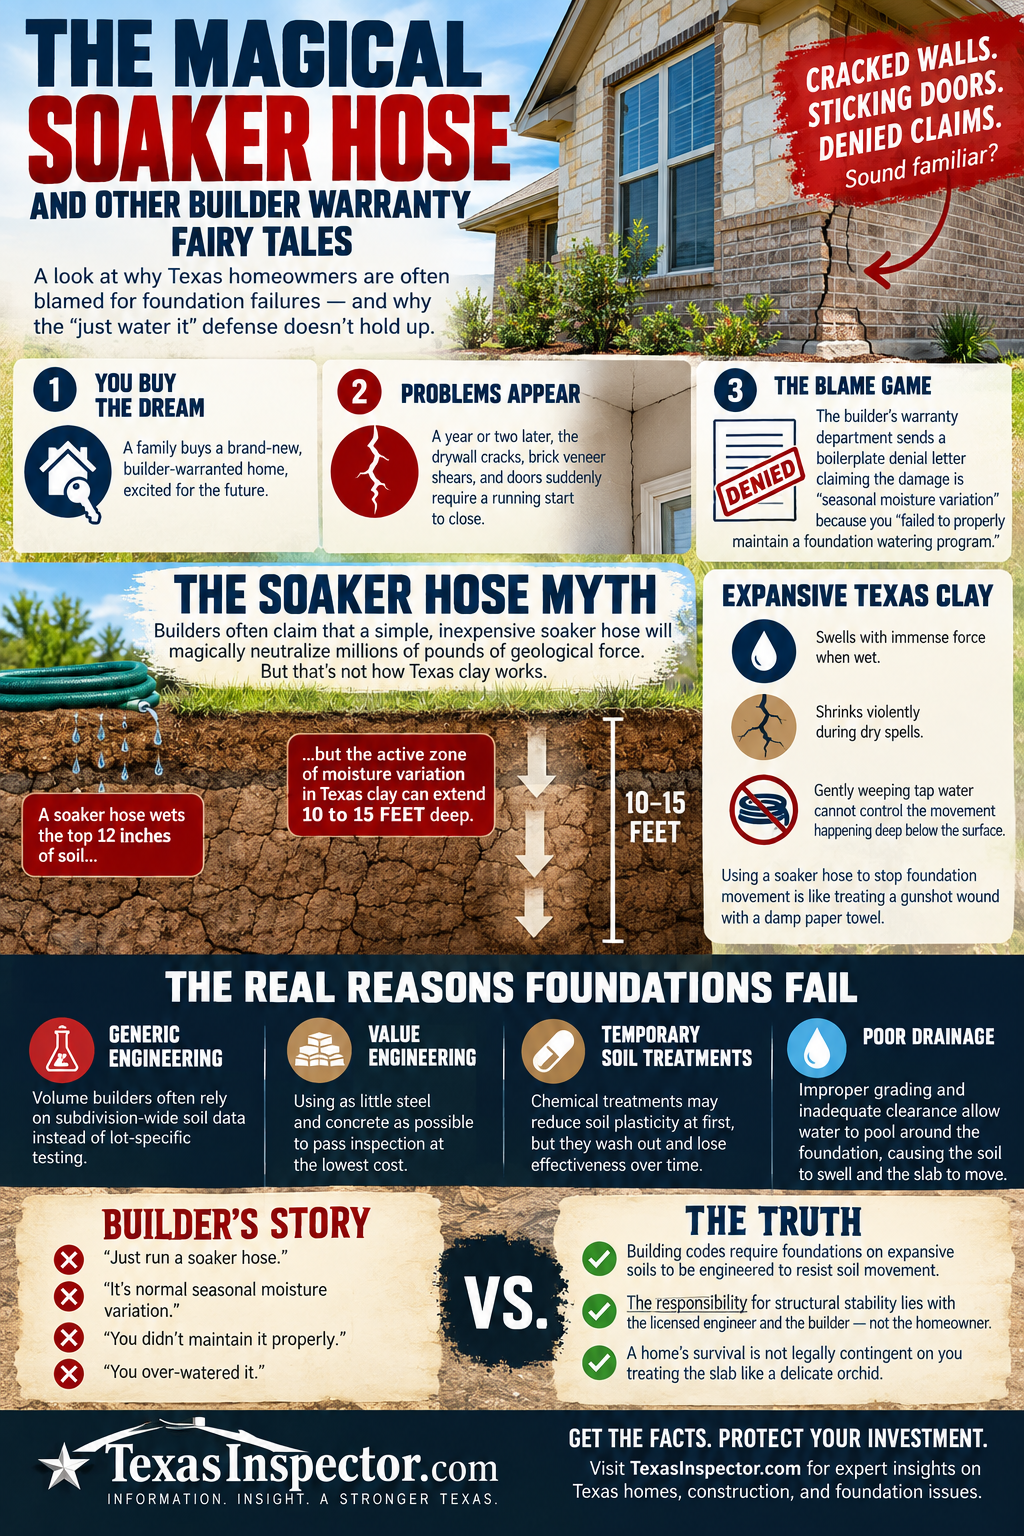
It is a predictably tragic comedy that plays out thousands of times across Texas the moment the rain stops. A family signs their life away for a brand-new, supposedly builder-warranted home, only to watch in horror a year or two later as their largest financial asset tears itself apart. The drywall fractures at the window corners, the brick veneer shears, and interior doors suddenly require a running start to close. Naturally, the naive buyer contacts the builder’s warranty department, expecting an actual structural repair. Instead, they receive a legally sanitized, boilerplate denial letter—likely pulled from a stack they keep next to the coffee machine—explaining that the massive edge heave destroying their house is merely “seasonal moisture variation.” The claim is denied, of course, because the occupant “failed to properly maintain a foundation watering program.” Ah, yes. The corporate builder’s favorite parlor trick: pinning the blame for a criminally thin, under-engineered post-tension slab squarely on the victim’s gardening habits.
To understand why this defense is scientifically laughable, you have to look at the reality of expansive Texas clay. This dirt acts like a massive geological sponge, swelling with immense force when wet and shrinking violently during dry spells. Yet, builders love to look buyers dead in the eye and tell them that running a fifteen-dollar plastic soaker hose from Home Depot around the perimeter of the house will magically neutralize millions of pounds of geological force. The hubris would be funny if it weren’t bankrupting families. During a severe Texas drought, the active zone of moisture variation can extend ten to fifteen feet below the surface. Gently weeping tap water onto the top twelve inches of dirt while the earth fractures fifteen feet down is the structural equivalent of treating a gunshot wound with a damp paper towel. Furthermore, both the International Residential Code and the Texas Engineering Practice Act explicitly require that foundations built on expansive soils be specifically designed to resist the movement of that soil. The law places the burden of structural stability squarely on the licensed engineer’s math and the builder’s execution. Nowhere in the building code does it state that a structure’s survival is legally contingent on an occupant treating a concrete slab like a delicate orchid that requires daily subterranean micromanagement.
The root cause of these catastrophic failures rarely has anything to do with a homeowner’s landscaping routine. It has everything to do with corporate “value engineering”—an industry euphemism for stripping out as much steel and concrete as humanly possible while keeping the house standing just long enough to pass a municipal inspection. Instead of paying for actual, lot-specific geotechnical soil testing, volume builders routinely rely on generic, subdivision-wide engineering data pulled from a zip code three towns over. When called out on these laughably shallow stiffening beams and widely spaced post-tension cables, builders will smugly pivot, claiming the soil was chemically pre-treated to reduce its plasticity. What they conveniently omit is that this chemical baptism is essentially a disappearing act. These treatments routinely wash out, degrade, and lose their effectiveness over time, acting as a cheap, temporary band-aid substituted for adequate concrete and steel. Once the chemical snake oil wears off, the foundation simply lacks the structural rigidity necessary to span the inevitable voids that form when the soil shrinks. Building on Texas clay is essentially building on a fluid, moving target. The foundation must be engineered from day one to withstand that movement, rather than built on a corporate gamble that the dirt will simply never dry out.
The true, breathtaking hypocrisy of the builder’s maintenance defense reveals itself when terrified buyers actually do try to water their foundations aggressively. If the soil heaves upward and cracks the slab in the opposite direction, builder defense experts will instantly pivot, clutch their pearls, and accuse the occupant of over-watering. It is a rigged game of Goldilocks where the dirt is never just right, and the builder is never, ever wrong. This also ignores the inconvenient fact that builders routinely fail to establish proper grading at the time of construction. When builders leave negative drainage or inadequate clearance from the grade to the brick ledge, surface water cannot naturally drain away from the foundation walls as strictly required by building codes. So, the water pools in the moat the builder generously provided, the soil swells, the foundation snaps, and the builder points the finger right back at the buyer for “poor drainage maintenance.”
Defeating this institutional gaslighting in a Residential Construction Liability Act claim requires methodical forensic unmasking of the builder’s initial shortcuts. Litigation attorneys and forensic experts must immediately demand the lot-specific geotechnical report to determine if the builder actually bothered to test the specific soil plasticity index and potential vertical rise for that exact address before pouring the concrete—spoiler alert: they probably didn’t, because why pay for science when you can just guess? Following that, a rigorous audit of the foundation design is necessary to compare the actual depth of the beams against what a legitimate, uncompromised structural engineer would have required. A proper forensic investigation will almost always uncover physical evidence of these initial code violations, revealing structural deficiencies that were baked into the cake long before the first drought ever arrived.
When cornered with actual math and code violations, builders will inevitably send out their own captive engineers—the very same rubber-stamp artists who blessed the inadequate subdivision plans to begin with—to write a report validating the denial. These reports are beautifully formatted exercises in corporate fiction, designed entirely to protect the builder’s bottom line while blaming the weather. But a properly engineered and adequately constructed post-tension slab in Texas is perfectly capable of surviving a long, brutal drought without tearing a house apart. When builders attempt to hide behind the soaker hose myth, buyers and their legal counsel must refuse to play their rigged game. Before allowing a warranty department to quietly drill a few cheap piers and slap some cosmetic mud on the drywall under the guise of a “goodwill repair”—a cynical, clock-killing tactic designed solely to keep you quiet until the statute of limitations runs out—the property must be evaluated by an independent, unbiased construction defect expert. True standard of care is established by rigorous building codes and engineering facts, not by the rehearsed, profit-protecting fairy tales of a warranty department.

Trying to find an unvarnished online review of a production homebuilder is like trying to find an honest politician or a load-bearing wall made of wet tissue paper: absolute fantasy. If you have ever wondered why every massive subdivision builder plowing over Texas farmland boasts a glowing four-and-a-half-star rating despite constructing foundations that snap like stale soda crackers, welcome to the multi-million dollar whitewashing theater known as Online Reputation Management. Out of roughly 450,000 residential builders and remodelers in the United States, upwards of 130,000 actively hire digital mercenaries or deploy specialized suppression software to gaslight the public, hide their crimes against carpentry, and vaporize their real customer feedback.
The Enterprise Machine Behind Your Search Results
The top two hundred corporate mega-builders now gobble up half of all new single-family home sales, and their adoption rate of reputation-laundering software sits at a terrifying, unbroken one hundred percent. While you are stressing over interest rates and life savings, these mega-corporations happily burn anywhere from $5,000 to over $15,000 every single month on crisis PR retainers and predictive AI algorithms. They do not view a customer’s crumbling slab as a structural emergency to fix; they view it as a toxic marketing risk to be strangled in its sleep before it touches their revenue pipeline. Meanwhile, mid-market regional builders spend thousands monthly embedding automated review engines like JobTread or NiceJob into their workflows, systematically harassing happy buyers at the peak of their closing-day high while duct-taping the mouths of angry clients struggling with active plumbing leaks.
The Digital Magic Tricks Used to Scrub the Web
The corporate maneuvers used to clean up this online trail would make an offshore accountant sweat. First comes review gating, where automated CRM software screens buyers with logic branches designed to sort emotional cattle. If a buyer is ecstatic, they get a red-carpet link straight to Google Maps; if they dare complain about a sagging roofline or missing insulation, they are shunted into an internal customer service black hole. When a massive structural defect or news investigation threatens to break out, reputation firms unleash suppression SEO, spamming search engines with bogus ghost sites like [Builder Name] Philanthropy to shove actual court dockets onto page four of Google. In Texas, builders turn the extortion knob to maximum during mandatory Residential Construction Liability Act negotiations, treating basic warranty repairs like hostage handoffs and refusing to fix a cracked slab until the desperate homeowner signs a non-disparagement gag clause waiving their right to speak online forever.
How to Spot the Cover-Up
Spotting these digital hitmen in action is trivial once you stop believing in fairy tales. Look for sudden, unnatural floods of generic five-star reviews dropped within a tight forty-eight-hour window that praise the sales rep’s friendly smile or the model home’s free coffee rather than the house’s framing or structural integrity. When a detailed Facebook thread complete with independent engineering reports mysteriously vanishes overnight, you can bet an aggressive legal cease-and-desist letter just landed in someone’s inbox. You can even right-click a builder’s landing page, select “View Page Source,” and spot tracking scripts for platforms like Birdeye working overtime in the background to filter out reality.
Where to Find the Real, Unfiltered Record
Since search algorithms are rigged to favor deep pockets, you need to look where a builder’s PR budget carries zero authority. Skip search engines entirely and march straight into the local county courthouse database. Search the county clerk’s land records and civil court dockets for the builder’s exact legal entity name to find out how many times they have been sued for structural fraud, breach of contract, or blatant negligence. While browsing public records, check for mechanic’s liens filed against the builder by unpaid subcontractors. If a builder is stiffing their concrete crews, framers, or electricians, those trades were almost certainly cutting corners and cutting ties on your house long before the drywall went up.
For actual human feedback without the corporate filter, bypass the polished model home and drive straight into a phase of the development built two or three years ago. Find a homeowner out mowing their lawn on a Saturday morning and ask them how many months it took the warranty department to acknowledge their water damage. You should also search for private, unmonitored resident groups on Nextdoor or Facebook created specifically by homeowners in that neighborhood. That is where real buyers vent about leaking windows, shifting foundations, and non-existent warranty repairs without an army of builder bots or PR lackeys moderating the room.
A crooked corporate builder writes off a $10,000-a-month crisis marketing budget as a basic tax-deductible expense, but a homebuyer left holding the bag on a $100,000 foundation failure has to pay out of pocket. Forget the fabricated five-star ratings, dig through court dockets, talk to actual neighbors, and hire an independent, ICC-certified inspector who works for you—not the builder—before you sign a single piece of paper.

The Dallas-Fort Worth metroplex is currently overflowing with two things: absurd amounts of unearned home equity and a seemingly bottomless supply of gullible homeowners who genuinely believe a full kitchen overhaul, master bath remodel, and second-story addition can be executed flawlessly for thirty grand by a guy named “Chad” they met on Instagram. Welcome to the Golden Age of DFW remodeling fraud, where naive residents act shocked—shocked!—when the absolute lowest bidder turns out to be a career grifter who wrecks their house, steals their money, and vanishes into thin air.
If you think that sounds overly cynical, allow me to introduce you to Christopher and Raquelle Judge of Judge DFW LLC. As detailed in federal court filings from the U.S. Attorney’s Office for the Northern District of Texas and reported by local outlets like WFAA News, this dynamic duo managed to fleece over forty North Texas families out of nearly five million dollars. Their business model was magnificently simple: flash some pretty rendering software on social media, claim to be a licensed architect when you’re absolutely not, collect massive upfront checks, do just enough destructive demolition to render the house totally uninhabitable, and then divert the cash into luxury cars, private school tuition, and plastic surgery. While dozens of homeowners were forced to live in campers over the holidays, the Judges were literally getting cosmetic procedures using their clients’ framing budgets.
How does a disaster of this scale happen so routinely in our area? Because in the Great State of Texas, consumer protection in residential construction is an absolute joke. The state mandates strict state licensing for hairdressers, manicurists, and massage therapists, but if you want to tear out load-bearing walls and re-wire a 200-amp electrical panel, all you need is a leased F-150, a magnet logo for the door, and zero conscience. Texas requires precisely zero general contractor licensing at the state level. Any convicted felon or failed used-car salesman can wake up on Monday morning, declare themselves a “master craftsman,” and start taking deposit checks from eager suburbanites desperate for a bargain.
As I have pounded into readers’ heads for years regarding the infamous “vanishing building code,” the scam almost always starts right there on paper. Shady contractors deliberately wipe any reference to actual building standards—like the International Residential Code—clean out of their contracts. Instead, they write in warm, fuzzy, completely meaningless garbage promising that “work will be performed in a good and workmanlike manner.” What does “workmanlike” mean? It means whatever the guy holding the hammer claims it means on any given Tuesday. Without explicit, legally binding code requirements baked directly into the agreement, you have zero leverage when your brand-new shower drains backwards into your hallway closet.
The deception deepens before a single tool even touches your drywall. Most of these fly-by-night operators aren’t even registered as contractors in the cities where they operate, meaning they couldn’t legally pull a building permit if they tried. So what do they do? They put on their best trustworthy face and start spinning fairy tales to convince you that permits are a big, scary mistake. They’ll tell you that pulling a permit “just slows down the job with government bureaucracy” or, my personal favorite, “it will alert the county tax assessor and double your property taxes overnight.” It’s an absolute line of crap. What they are actually saying is: “Please don’t let anyone with a clipboard see the fire hazards I’m building in your new kitchen.”
And for the love of sanity, stop believing that a municipal building permit is your knight in shining armor. As I’ve explained in my guides on navigating Texas building codes, a city building inspector is not your personal concierge or quality assurance manager. They are overworked city employees who pull up to your driveway, glance out the window for forty-five seconds to make sure your house isn’t actively collapsing onto the sidewalk, drop off a green tag, and zoom off to their next thirty appointments. A city sign-off means you achieved the absolute bare minimum standard required by law to avoid immediate code enforcement—it does not mean your contractor installed your flashings correctly or built anything worth paying for.
When the project inevitably collapses into chaos, homeowners suddenly discover that the legal system is stacked entirely against them. Bad contractors love hiding behind Chapter 27 of the Texas Property Code—the infamous Residential Construction Liability Act—and mandatory arbitration clauses buried in their boilerplate contracts. These clauses are designed to trap you in an endless, soul-crushing cycle of legal notices, cure periods, and private arbitration fees that will drain your remaining life savings before you ever get a day in court. By the time you realize you’ve been taken, the contractor has already dissolved their LLC, formed a brand-new one under a slightly different name, and bought another jet ski or just moved to another state to start the scamming anew.
This shameless grift reaches a fever pitch every time a hail cell rolls through DFW. Within twenty-four hours, a swarm of out-of-state storm-chasers descends upon your neighborhood offering to “absorb,” “waive,” or “rebate” your insurance deductible. The Texas Department of Insurance warns people about this constantly, because it explicitly violates Section 27.02 of the Texas Business and Commerce Code. When you sign up for this little scheme, you aren’t beating the system; you are committing insurance fraud, setting yourself up to have your policy canceled, and handing your roof over to a crew whose idea of quality control is a bucket of tar and a prayer.
If you actually want to survive a remodeling project in North Texas without losing your home or your sanity, stop being so gullible. Stop falling for the lowest bid, because cheap labor is always astronomically expensive in the long run. Demand a contract that explicitly binds the contractor to current adopted municipal codes, not vague promises of “quality.” Never, under any circumstances, hand over massive cash deposits upfront. Tie every single payment draw directly to written sign-offs from an independent, ICC R5-certified third-party inspector who works for you, not the builder. Verify that the contractor is registered with your city, demand proof of active general liability insurance, and have a competent construction attorney review every line of the contract before you sign it. Otherwise, don’t be surprised when your “dream remodel” turns into a starring role on the local evening news.
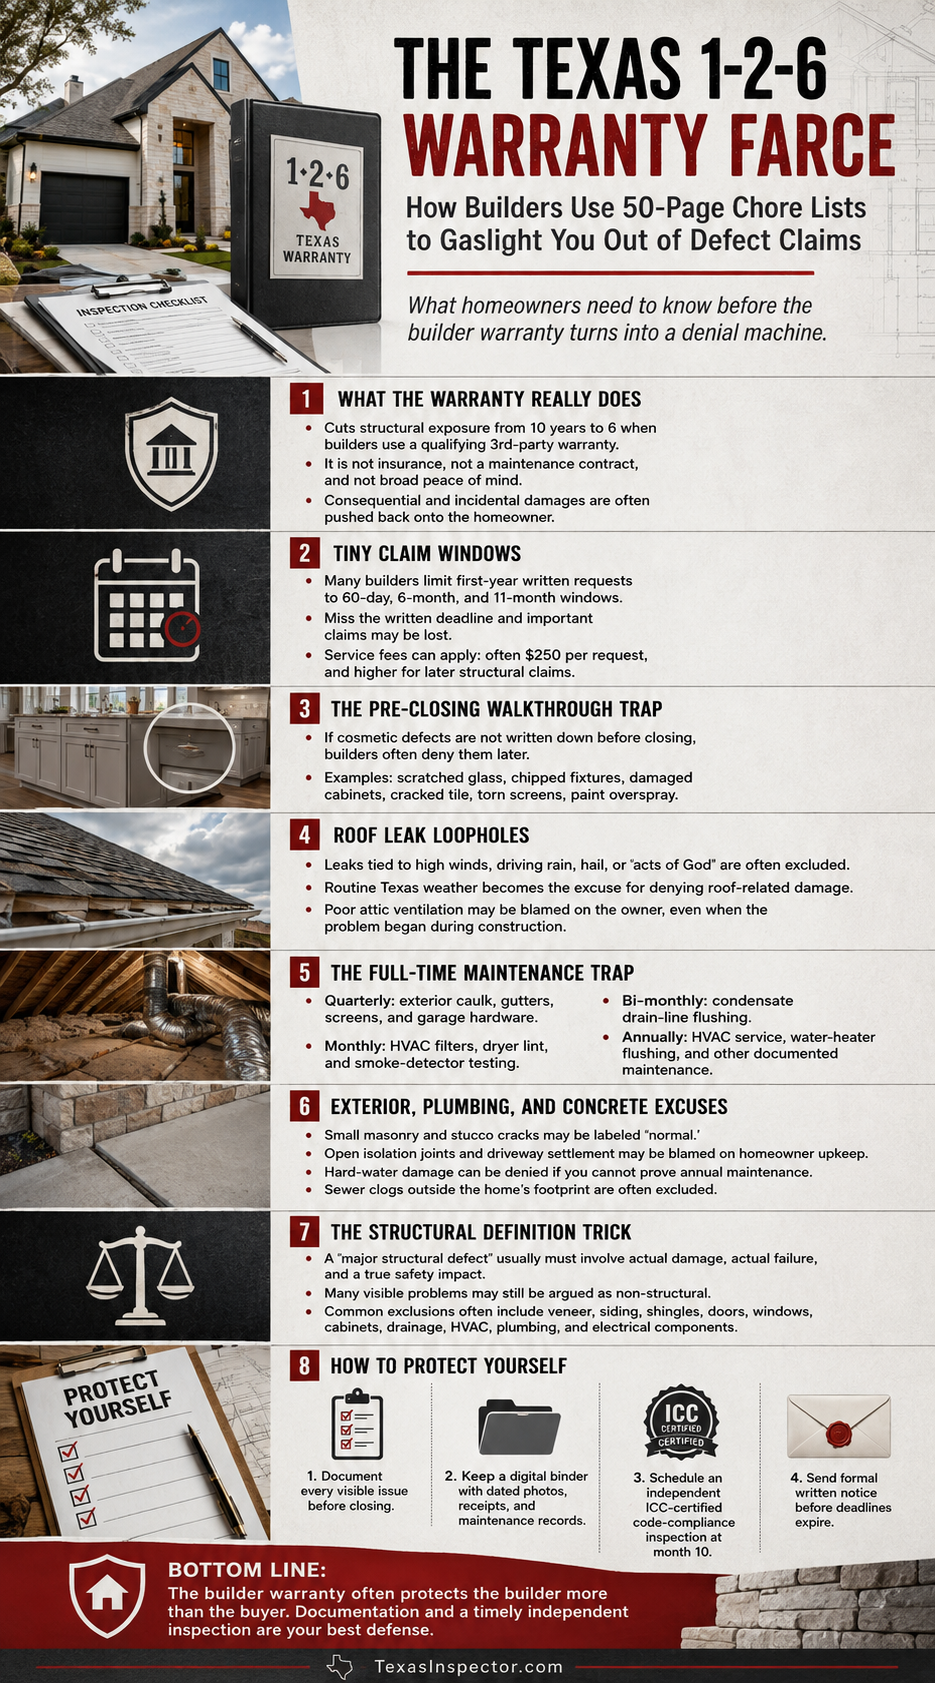
Congratulations on purchasing a brand-new production home in Texas! At closing, the builder’s representative proudly hands you a leatherette binder containing an express third-party warranty. Sales reps frame this as total peace of mind, but in reality, Texas House Bill 2024 allowed volume builders to shrink their statutory structural liability window from ten years down to six under Texas Civil Practice and Remedies Code Section 16.009, provided they hand you this exact piece of paper. The fine print explicitly clarifies that this document is not an insurance policy, a maintenance agreement, or a service contract—it is essentially a formal declaration that the builder intends to fix as little as legally possible. By signing, you happily waive all common-law implied warranties, including basic habitability and good workmanship, while agreeing that any consequential or incidental damages are strictly your financial problem, capped at the original purchase price. To ensure you rarely get a dime of help, builders restrict formal service requests to exactly three brief windows during the entire first year: 60 days, 6 months, and 11 months post-closing. Miss submitting your written list during one of those tiny windows? Too bad. Should your builder default on year-one or year-two repairs, the third-party warranty administrator will gladly step in—after you hand over a mandatory two-hundred-and-fifty-dollar service fee per request. That fee doubles to five hundred dollars per request for structural claims in years three through ten. Naturally, all of this conditional protection instantly vanishes if you fail to execute every absurd chore demanded by their homeowner maintenance manual.
The Cosmetic Trap of the Pre-Closing Walkthrough List
The warranty manual sets its first trap before you even receive your keys by mandating a signed, dated pre-closing walk-through inspection list. You might think this list is just a friendly checklist for minor paint touch-ups, but legally, it is an absolute boundary line. If a cosmetic or surface defect is not documented on that piece of paper prior to occupancy, the builder is legally absolved of fixing it forever. Did you fail to notice a scratched window pane, a clouded double-pane seal, or broken window glass? Congratulations, you own it. Did you miss a chipped plumbing fixture, a scratched chrome faucet, a gouged cabinet door, a delaminated laminate countertop, or a chipped ceramic floor tile? The warranty explicitly disclaims all of them unless they were written down before you moved in. Even concrete splatters on adjacent surfaces, torn screen mesh, paint splatters, overspray, and gouged resilient vinyl flooring are automatically written off as owner negligence if they were not recorded on that initial walk-through document.
The “Act of God” Roofing Farce
Roofing coverage is perhaps the most hilarious piece of legal comedy in the entire binder. Page twelve of the standard warranty book claims the builder will correct active roof leaks—but only those occurring under “normal conditions”. The fine print immediately clarifies that no action is required if the leak is caused by “high winds or driving rains”, while the broad exclusions section disclaims any loss or damage resulting from “acts of God or nature, windstorms, or hail”. In North Central Texas, spring supercells, 60-mph wind gusts, driving sideways rain, and severe hail storms happen every single year like clockwork. That is standard Texas weather. Yet, the builder’s legal contract defines “normal conditions” so hyper-narrowly that it essentially means a windless, 70-degree afternoon drizzle. The moment actual, routine Texas weather hits your roof—the exact weather the roof assembly was built to withstand—the builder instantly writes off the resulting ceiling leak as an un-warranted “Act of God” or driving rain event. Meanwhile, if shingles lift, curl, or cup, the warranty states zero builder action is required unless the cupping exceeds half an inch, at which point you are told to take it up with the shingle manufacturer. If shingles blow off, you carry the burden of proving the wind was below manufacturer speed specs. Up in the attic, International Residential Code Section R806 mandates continuous cross-ventilation. Subcontractors routinely blow loose insulation directly into the eaves, crushing soffit baffles and choking off intake airflow. During summer, attic temperatures soar past 140 degrees, baking shingles and warping ceiling framing. When you file a roof claim, the builder points to exclusions for dampness, condensation, or heat buildup caused by owner failure to maintain proper ventilation, blaming you for choked vents buried under insulation before drywall was even hung.
The Exterior Caulk Scam and Ridiculous Masonry Tolerances
The builder’s maintenance schedule demands that you perform quarterly inspections on all exterior window and door caulking, alongside quarterly inspections of your exterior drainage and gutters. You are also tasked with inspecting and cleaning brick weep holes semi-annually, inspecting door and window screens quarterly, and cleaning those screens semi-annually. Why is the builder so obsessed with your quarterly caulking inspection? Because subcontractors slather cheap acrylic latex painter’s caulk over damp OSB, unprimed fiber-cement board, and dirty brick veneer without using closed-cell backer rods to prevent three-sided adhesion failure. Under the brutal Texas sun, this cheap sealant cracks within months. When rainwater bypasses the split caulk and rots wall framing, the builder will not compensate you for missing window head flashings or unsealed weather barriers. Instead, they point to your failure to log a quarterly caulk inspection and declare that wall rot is excluded due to owner neglect. Siding separations under three-eighths of an inch are reclassified as routine owner maintenance. The brick veneer logic is even more absurd: while you are required to clean weep holes every six months, warranty performance standards explicitly declare that mortar and brick cracks up to a quarter-inch wide are routine owner maintenance requiring zero builder action. Stucco cracks up to an eighth of an inch are dismissed as hairline normalities. Your exterior masonry can literally split open, and the builder will legally reclassify it as your weekend chore until the brick falls off the house.
The Full-Time Indoor Chore Marathon and HVAC Traps
Step inside the house and your new homeownership journey transforms into a full-time, unpaid facilities management job. You are ordered to inspect and replace interior caulking in all wet areas semi-annually, clean your garbage disposal monthly, scrub faucet aerators bi-monthly, and inspect plumbing drains semi-annually. You must also clean dryer lint filters monthly, clean out the main dryer vent exhaust annually, clean the range hood fan filter quarterly, test smoke detectors monthly, inspect and clean fireplace flues annually, inspect metal front door finishes semi-annually, and—believe it or not—repaint the front door annually. You are even required to lubricate garage door hardware quarterly and conduct full garage door inspections semi-annually. On the HVAC side, the schedule demands monthly air filter replacements, bi-monthly condensate drain line flushes, and mandatory annual servicing by a licensed contractor. When an attic air handler built with an unlevel drain pan overflows, the builder’s inspector checks the condensate drain line for standing water. The moment they spot a trace of algae, the entire drywall damage claim is denied as deferred homeowner maintenance because you missed a bi-monthly vinegar flush. The warranty standards also state that cooling systems are only required to maintain 78 degrees indoors when outdoor temperatures hit 95 degrees, and room temperature variations up to 4 degrees are completely normal. When metal ductwork makes loud oil-canning ticking noises or GFCI outlets trip constantly, the warranty dismisses them as normal conditions. Because the warranty explicitly excludes all consequential damages, ruined hardwood floors, stained drywall, and ruined personal property are dumped entirely onto your personal home insurance policy.
Plumbing Exclusions, Unsealed Flatwork, and Foundation Excuses
Plumbing coverage is equally illusory. The maintenance schedule demands that homeowners flush their water heater annually. Production builders routinely mount sensitive tankless units directly onto raw municipal water lines in Texas cities where dissolved calcium carbonate regularly exceeds three hundred parts per million, completely omitting scale-inhibition filters or softeners. When hard mineral scale bakes onto the heating core and destroys it in year two, the builder demands your annual maintenance logs. If you cannot produce invoices proving annual flushing, the claim is denied for owner neglect. Pipe freezing is blamed on owner failure to winterize or maintain heat, and sewer clogs are only covered if the blockage occurs within the structure’s footprint—any clog past the exterior foundation wall is entirely your problem. The exact same liability shift occurs on concrete flatwork. American Concrete Institute standards ACI 302.1R and ACI 325.9R state that joints between flatwork and foundation slabs are isolation joints that must be sealed with flexible elastomeric sealant during construction. Builders leave these joints open, list joint sealing as owner upkeep, and let heavy rains wash out subgrade soil. When driveways drop, the builder claims open joints are homeowner neglect while hiding behind warranty standards that explicitly classify attached garage slab cracks or driveway settlement up to a quarter-inch vertical displacement as acceptable. For yard grading, standing water within 10 feet of the foundation is allowed to sit for 24 hours (48 hours in swales) before it is considered a defect, and settled soil around foundation backfill will only be filled by the builder a single time, provided the settlement exceeds 6 inches.
The Structural Definition Trick and Total Exclusions
The headline ten-year structural warranty sounds impressive until you read the legal definition of a Major Structural Defect in Section I.B.14. To qualify as a structural defect, three strict conditions must simultaneously occur: there must be actual physical damage to a specified load-bearing component, that component must actually fail, AND the failure must affect its load-bearing function to the degree that it materially affects the physical safety of the occupants. If your foundation cracks, twists framing, and jams every door in the house, but the roof has not collapsed onto your head, the builder can legally argue that occupant safety is not materially endangered. To make matters worse, the warranty explicitly lists components that are contractually deemed NOT to have structural defect potential. This exclusion list includes non-load-bearing walls, drywall, plaster, subflooring, flooring, brick veneer, stucco, stone, exterior siding, roof shingles, tar paper, roof sheathing, HVAC systems, plumbing systems, electrical systems, doors, windows, trim, cabinets, hardware, insulation, paint, stain, and both interior and exterior drainage systems. Furthermore, structural coverage completely excludes attached decks, patios, porches, stoops, porch roofs, chimneys, and garage floors after the very first year.
Outsmarting the Builder Paper Trail
Defeating this contractual setup requires treating your homeowner maintenance manual as an adversarial legal compliance file from the moment you receive the keys. Site supervisor verbal assurances carry zero legal weight under Texas Property Code Chapter 27. Skip casual walkthroughs and hire an independent, ICC-certified building code consultant who actually understands structural framing, ACI concrete standards, and IRC building codes. Have them perform a comprehensive code-compliance inspection at month ten—right before your 11-month builder claim submission deadline closes forever. Keep a dedicated digital binder packed with dated receipts for every single HVAC filter, bi-monthly condensate flush photo, annual licensed HVAC service invoice, water heater flush log, and photo of sealed isolation joints. When defects emerge, skip the polite phone calls and send formal, written notices detailing specific code non-compliance items via certified mail with return receipt requested before statutory warranty deadlines expire.

If you still naively believe the biggest threat to your North Texas property insurance is a late-spring hailstorm, wake up. The real threat is floating 300 feet directly above your driveway—and sitting on its collective fat ass in plush leather chairs down at the Texas Department of Insurance (TDI) in Austin.
Over the past six years, Texas home insurance premiums have exploded by nearly 80 percent, giving North Texas the dubious honor of paying some of the most outrageous rates in the entire nation. How does an industry pull off this kind of daylight robbery? With the direct, enthusiastically rubber-stamped permission of TDI. Operating under the state’s cozy “file-and-use” regulatory system, TDI acts less like a public consumer watchdog and more like a high-dollar concierge service for insurance underwriters. Insurers submit absurd double-digit rate hikes, TDI nods along like a dashboard bobblehead, and homeowners get handed the tab.
Having systematically gouged regular Texans out of their hard-earned equity, insurance carriers have moved on to phase two of their cynical little game: dropping policyholders en masse before the next storm system rolls through. But why pay actual, competent field adjusters to walk a roof when you can fire them all and replace them with dirt-cheap satellite photography, fixed-wing passes, and third-party drone fleets running primitive, bottom-of-the-barrel AI algorithms?
Under Texas Insurance Code Chapter 551, carriers must give you 60 days of written notice before a non-renewal. Furthermore, under Texas House Bill 2067, they are legally obligated to provide the specific written explanation detailing why you are being dropped. But when those letters hit DFW mailboxes, the “reasons” almost never stem from real-world structural failure. They trace back to minor maintenance items that lazy homeowners neglected—or low-angle, two-dimensional aerial cameras that completely hallucinated damage out of thin air.
Granule Loss and De-bonding: The “Dark Patch” Hallucination
Aerial AI looks for basic color contrast shifts, roof shadows, or dark spots, automatically flagging those areas as catastrophic hail damage, unbonded shingles, or bare fiberglass matting. The ground reality? A brainless algorithm cannot tell the difference between functional asphalt erosion and harmless Gloeocapsa magma, the cosmetic black algae staining every third roof in humid North Texas. Furthermore, a satellite camera thousands of feet in the air cannot physically test for seal-strip adhesion. A roof flagged by a lazy underwriter as gearing toward structural collapse is frequently just an eight-year-old roof that needs a hundred-dollar zinc wash, not a $25,000 asphalt replacement.
Overhanging Tree Limbs: Phantom Branches on a Flat Plane
This is the single biggest victim of cheap, flat-plane satellite technology. Direct vertical overhead shots collapse three-dimensional space into a flat 2D picture. The result? A perfectly innocent tree canopy looks like it is physically crushing your roof deck. While tree branches actually scraping a roof violate basic standards of practice by providing a direct highway for roof rats and scrubbing off protective granules, top-down satellite views completely lack vertical depth perception. An oak branch floating six to eight feet cleanly above a ridge line appears to be scraping the shingles from an overhead camera. Without an in-person elevation assessment, carriers issue bogus non-renewals for phantom limbs that aren’t even touching the damn house.
Debris Accumulation: Marking a 15-Minute Task as a Structural Failure
Aerial scanners spot dark, clumped lines along roof valleys, dormers, and chimney crickets, instantly flagging fallen leaves and post-hail oak tassels as catastrophic moisture retention hazards. While trapped debris can back up water under counter-flashings over time, an automated drone marks a simple fifteen-minute maintenance task like sweeping a valley as an uninsurable structural defect.
Backyard Outbuildings: The Unpermitted Death-Trap Flag
As North Texas cities relax single-family zoning rules, backyards are filling up with cheap, unpermitted detached offices, casitas, and covered patios built by tailgate contractors. Aerial algorithms cross-reference building footprints against municipal tax maps. If a drone flags an unpermitted shed tapped illegally into the main house panel, or a patio cover tied improperly into the fascia without structural ledger framing, insurers drop the primary residence policy entirely due to unmanaged fire and wind-uplift hazards.
Low-Slope Ponding: Confusing Standing Water with Deck Rot
Satellite infrared and optical sensors regularly flag standing water on flat or low-slope roof sections forty-eight hours after a rain event, instantly declaring it active roof deflection or rotting decking. Meanwhile, improper perimeter grading—the undisputed king of slab foundation failures in North Texas clay—gets completely overlooked by the sky cameras until excessive vegetation growth signals moisture pooling near the grade.
How to Smash a Bogus Non-Renewal
If your carrier hits you with an automated non-renewal letter based on 2D satellite images claiming your roof has phantom tree limbs or non-existent damage, do not panic, and do not let a sleazy storm-chasing salesman scare you into signing a massive contract.
Force the Evidence: Demand the exact evidence package under Texas HB 2067. State law requires carriers to provide the specific written justification and source data. They regularly drop coverage using outdated aerial passes, low-resolution garbage, or photos of your neighbor’s property down the street.
Get Ground-Truth Photos: Take date-stamped, eye-level photographs showing the actual vertical clearance between your roof deck and the tree canopy. Prove the 2D flattening effect is a cheap, fraudulent lie.
Hire a Real Roofer, Not a Drone: An automated camera thousands of feet up cannot measure branch clearance, test shingle pliability, check step-flashing integration, or inspect attic decking for active leaks. A licensed, certified, reputable roofing contractor provides an unbiased, ground-truth evaluation of the structural system.
Nail Them with a Rebuttal: Submit a certified rebuttal package with ground photos and a professional evaluation report directly to the carrier’s underwriting appeals department. Then file a formal complaint with the Texas Department of Insurance—if for no other reason than to force TDI’s comfortably numb bureaucrats to actually open a file and force the carrier to manually review the evidence. This might (certainly will) be wasted time, but it could make you feel better.
Documented physical verification by a real human roofer forces the carrier to review the file manually or gives you the exact paperwork needed to secure coverage elsewhere in the private market before being forced into the state insurance pool. Don’t let a blind algorithm sitting alongside a toothless, captured state regulator judge your home’s structural integrity when an educated homeowner with ground-level proof can disprove a drone camera every single time.

There is nothing quite like walking into your shiny new home in the Dallas-Fort Worth metroplex. The paint smells fresh, the countertops are pristine, and you are riding high on that new-build optimism, assuming that because everything is brand new, you are fully protected for the next decade.
Wipe that smile off your face for just a second, because corporate fine print is waiting in the bushes to bite you.
Every year, homeowners call an HVAC technician, an appliance repairman, or a plumber in year six when their air conditioning condenser, garage opener, or water heater decides to die in the middle of a 105-degree Texas August. They expect the manufacturer’s extended warranty to cover the thousand-dollar replacement parts, only to be slapped with the reality that their equipment was never registered, meaning their coverage actually expired years ago.
The 60-Day Registration Trap
Major HVAC manufacturers—the big names like Trane, Lennox, and Carrier—love to boast about their shiny 10-year parts warranties on billboard ads. What they whisper in microscopic text at the bottom of the page is the catch: you only get that 10-year warranty if you register the equipment online within 60 days of closing.
If you miss that narrow window, the corporate gods automatically demote your protection down to a measly 5-year Base Limited Warranty. By failing to fill out a basic web form, you just forfeited five full years of parts coverage on equipment that costs a small fortune to repair or replace.
Who is Responsible? (The Builder’s Game of Pass the Buck)
If you think your builder or their subcontractors registered this stuff for you out of the goodness of their hearts, think again.
Builders care about their short-term 1-to-2-year workmanship warranty. Once that year is up, or once they hand you the keys at closing, they wash their hands of your mechanical equipment. The manufacturer’s warranty belongs to the end user—which means the legal and financial burden of pressing “Submit” on that registration form rests squarely on your shoulders.
Here is a critical detail most people mess up: the registration clock starts on your official Closing Date, not the date some subcontractor bolted the equipment to the wall months prior while the house was still framed studs.
The Indoor HVAC Mistake
Don’t make the rookie mistake of thinking registration is just for the big metal A/C box sitting in your flowerbed.
Your outdoor condenser is only one part of a matched HVAC system. You also have a gas furnace or electric air handler, along with an evaporator coil casing tucked away in your blazing-hot attic. Each of those components has its own separate model and serial number, and each one requires its own registration. If you only register the outdoor unit, your indoor attic equipment gets locked into that sad 5-year default warranty.
Water Heaters, Pool Gear, and Kitchen Appliances
The warranty registration game extends across your entire home, but the rules shift depending on the equipment sitting in front of you.
Tankless water heaters from brands like Rinnai and Navien typically come with a standard 12-to-15-year heat exchanger warranty right out of the box. However, registering them online within 30 to 90 days unlocks a crucial upgrade: it bumps your free labor warranty from a brief 1 year up to 5 years. More importantly, it forces the manufacturer to start counting your coverage from your actual closing date rather than the day the unit sat in a wholesale distributor’s warehouse. Standard tank water heaters require registration for the exact same reason—to prevent losing six months of coverage that elapsed while the home was under construction.
If your new build includes a pool, brands like Pentair, Hayward, and Jandy are even more ruthless, dropping your equipment coverage from three years down to a single year if you fail to register a matched system.
Then come your built-in kitchen appliances. Refrigerators, double ovens, dishwashers, and cooktops usually offer a standard 1-year limited warranty. Because builders purchase appliance packages in massive wholesale batches months before your house is completed, an unregistered dishwasher might have its warranty start on the day it left the warehouse floor. Registering your appliances immediately ties the start of that 1-year clock directly to your Closing Date so you get every single day of coverage you paid for, while ensuring you receive immediate notification if a critical safety recall is issued.
Smart Home Tech, Garage Openers, Laundry, and Sprinklers
The trap gets even broader when you look at the tech and convenience gear builders use to sweeten the deal.
Smart home packages featuring Ring doorbells, Nest or Ecobee thermostats, and smart deadbolts carry strict 1-year hardware warranties. If you do not create your owner account and upload your Closing Disclosure right away, the manufacturer considers the build date as day one. That means your 1-year doorbell warranty might actually be 90 days from expiring on the day you move in.
Garage door openers from LiftMaster, Genie, or Chamberlain often boast impressive 10-year or lifetime motor and belt warranties, but their internal circuit boards, wall buttons, and safety sensors are only covered for 1 to 3 years. Without online registration tying the unit to your closing date, the manufacturer defaults to the DOM stamp—the Date of Manufacture—stamped on the metal casing hanging from your garage ceiling.
If your builder provided a washer and dryer package, or if you brought in standalone appliances, pay close attention to the fine print from LG, Samsung, or Whirlpool. While the general appliance warranty is 1 year, these manufacturers often include 10-year limited parts warranties on direct-drive washer motors and digital inverter refrigerator compressors. To claim a replacement compressor in year seven, you must prove when your ownership began. Registering at move-in saves you from an ugly paper trail battle later.
Even your yard is on the clock. DFW builders routinely install smart sprinkler controllers like Rachio, Rain Bird, or Hunter to meet city water conservation requirements. These controllers carry 2-to-3-year warranties that require app setup and registration to anchor the start date to your closing day rather than the day the landscaping crew plugged it in.
Texas Law and Resale Value
Registering your gear isn’t just about protecting your own wallet today; it’s also about setting up your resale value tomorrow. Under Texas Business & Commerce Code Chapter 608, residential HVAC warranties automatically transfer to future buyers without transfer fees or administrative hurdles.
However, the law only transfers whatever warranty length is currently active. If you registered your system properly and sell the home in year five, the buyer inherits five full years of remaining coverage, which makes your listing look fantastic. If you forgot to register, that warranty is completely dead at year five, leaving the next owner with zero protection.
The Move-In Day Action Plan
Fixing this takes about 15 minutes between unpacking boxes, and you can pull it off without needing a complicated checklist.
First, grab your smartphone and go on a quick hunting expedition through your utility areas, garage, kitchen, yard, and attic. Take clear photos of the metal data plates displaying the model and serial numbers on your outdoor A/C condenser, attic furnace, evaporator coil casing, water heater, kitchen appliances, washer and dryer, garage door opener motor, sprinkler controller, and smart doorbell.
Next, grab your Closing Disclosure from your settlement stack so you have your official closing date ready to plug in as the installation date.
Finally, sit down at your computer, visit the registration page for each equipment manufacturer, type in the serial numbers, and download the PDF confirmation receipts directly to a dedicated home folder on your desktop.
Protect Your Investment
Protecting your home isn’t just about filling out web forms, though. Before your 1-year builder warranty expires and leaves you holding the bag for construction mistakes, you need to know what defects were left behind in your attic, roof, and foundation. Schedule your 11-Month Warranty Inspection with Texas Inspector today, and let us force the builder to fix their mistakes on their dime, not yours.

Step into any master-planned model home in Celina, Princeton, or Midlothian, and you will be greeted by designer staging, complimentary espresso, and a sales rep whose canned smile promises you the suburban dream. They love talking about quartz countertops, luxury vinyl plank flooring, and temporary interest rate buydowns that make monthly payments look suspiciously reasonable. What they conveniently forget to mention while sliding the contract across the desk is that you are not just buying a house; you are quietly inheriting a thirty-year civil engineering debt trap.
The PID Magic Trick and News Exposure
Builders in outer-ring North Texas suburbs love Public Improvement Districts (PIDs) and Municipal Utility Districts (MUDs) because these mechanisms let them finance roads, pipes, and sewers using future buyers’ money instead of their own capital. When you ask about taxes in the sales office, reps routinely quote the baseline city or county rate while muttering something delightfully vague about a nominal district fee. Multiple investigative reports by the CBS Texas I-Team highlighted this exact scheme when nearly one hundred buyers in a Denton development discovered they were hit with surprise $31,000 PID assessments that added tens of thousands of dollars in interest. Similar cases surfaced in Royse City, where homeowners watched their expected assessments more than triple after signing contract paperwork, leading real estate litigation attorneys like Rachel Khirallah to represent over a hundred North Texas buyers fighting these predatory debt structures.
Why This Nightmare Is Completely Legal
While this setup feels like an outright scam, developers are operating completely within the law thanks to builder-friendly Texas statutes. Under Texas Property Code Section 5.014, sellers are technically required to provide a statutory written PID disclosure notice before a buyer signs a binding contract. However, builders do not hide the PID notice; they bury it inside an eighty-page digital contract package alongside dozens of other addenda. The moment you electronically sign that standardized addendum, you have legally acknowledged the thirty-year assessment, rendering any verbal promises from sales reps completely useless in a court of law.
Bargain-Bin Engineering in DFW Black Gumbo
The financial sleight of hand is only half the battle, as the physical quality of PID-funded civil work is where the real comedy of errors begins. North Texas is infamous for expansive clay soil that swells and shrinks like a breathing sponge, requiring meticulous ground prep, soil stabilization, and serious civil engineering. Instead, developers rush land prep to get framing crews on-site quickly, dropping retaining walls and drainage channels straight onto raw, uncompacted mud. Within a year of move-in, those picturesque concrete retaining walls start leaning like the Tower of Pisa, while lot-line swales transform into stagnant, mosquito-infested moats that pool water directly against brand-new slab foundations.
The Municipal Shield and the HOA Cut-and-Run
If you expect municipal inspectors to save you from poor site grading, you will be sorely disappointed. City inspectors only check for bare-minimum surface code compliance on the day of inspection, allowing builders to hide behind a legal shield once the municipality signs off on the phase. Under Texas Property Code Chapter 209, developers are legally permitted to retain total control of the HOA board until the entire subdivision is built out. During construction, the builder keeps HOA dues artificially low to attract buyers while ignoring decaying drainage structures, only to hand the keys to bewildered residents the second the final house closes, leaving the community with an empty reserve fund and massive infrastructure repair bills.
How North Texas Homebuyers Protect Themselves
Protecting yourself from this circus requires throwing out the builder’s glossy marketing brochures and doing your own ruthless digging before putting down a single dollar of earnest money. Start by checking the local County Appraisal District portal to verify the actual combined tax rate and PID line items rather than trusting the estimated payment sheet printed in the sales office. You must demand the official written PID disclosure notices upfront, ensuring every assessment dollar is calculated into your long-term debt-to-income ratio before signing. Finally, hire an independent inspector to step outside the footprint of the home and evaluate macro site grading, retaining wall plumbness, and perimeter drainage swales so you force the builder to fix their cheap site prep mistakes before they become your permanent financial burden.

AI-Powered Home Inspection Software Is a Gift to Bad Builders
There is a fresh new plague sweeping through the Texas real estate market, and if you are currently buying a home, you should be terrified. Tech hustlers and software pushers have officially discovered home inspection, aggressively pitching “AI-powered” reporting platforms to licensed inspectors who are all too eager to outsource their thinking to an algorithm.
The sales pitch is as lazy as it is alluring: snap a quick phone picture of a defect, let a computer vision algorithm evaluate it, and watch as an app auto-generates code citations, formats comments, and completes a full inspection report before the inspector even walks back to their air-conditioned truck. Inspectors love it because it lets them pretend to be technical experts without opening a book, while real estate agents love it because it keeps deal-killing defects off the radar. Homebuilders are practically throwing parades in its honor.
The “Human-in-the-Loop” Myth
Software vendors often defend these tools by claiming that AI is merely an “assistant” and that inspectors remain “in the loop” to verify every line before sending the final report. But this defense collapses under the slightest technical scrutiny: you cannot verify what you do not already know.
When an inspector lacking actual building code training receives an authoritative-sounding AI narrative, they do not fact-check it against the codebook. They blindly click “approve”. Rather than acting as a safeguard, “human verification” becomes a passive rubber-stamping process for algorithmic guesswork.
Follow the Money: The Industry Trade Group Feedback Loop
Why are major inspector membership associations and industry organizations so eager to host summits, virtual learning days, and promotional campaigns urging inspectors to embrace AI? Simply follow the money.
These industry associations are heavily bankrolled by corporate “affiliates” and commercial sponsors—specifically, the software vendors selling recurring AI reporting subscriptions and the Errors & Omissions (E&O) insurance providers who profit from selling claims coverage when things go wrong. Software companies want monthly subscription fees, insurance carriers want higher premiums to cover liability risks, and industry groups collect sponsorship checks to market these platforms to their members.
It is a self-serving financial ecosystem: software pushers build push-button tools, industry associations hype them as “the future of the trade”, and insurance providers stand by with E&O coverage for when hallucinated reports inevitably result in missed defects. The only party left out in the cold is the homebuyer, whose multi-hundred-thousand-dollar investment gets sacrificed on the altar of speed and recurring software fees.
The Systemic Joke of Texas New Construction Inspections
To truly appreciate the comedy of errors happening on new construction sites across Texas, you first have to understand the dirty little secret of the state’s licensing system. The average homebuyer naturally assumes that an inspector licensed by the Texas Real Estate Commission (TREC) is a master of building mechanics, structural framing, and safety standards.
However, TREC’s own official Standards of Practice explicitly declare that licensed inspectors are not required to determine compliance with building codes, are not required to verify code enforcement, and are not required to have a single hour of actual construction experience. It is an absolute masterclass in regulatory irony that Texas allows these code-exempt inspectors to walk around active job sites.
This convenient setup aligns perfectly with decades of aggressive homebuilder trade group lobbying designed to ensure third-party inspections remain harmless and toothless. When you hire a standard TREC inspector for a brand-new build, you are essentially paying for a box-ticking flashlight tour guide who operates under a regulatory framework specifically engineered to keep them completely clueless about the very building codes holding your roof over your head.
Hallucinations on Parade: Asking AI About Building Codes
Because standard real estate licenses require zero code knowledge, software pushers smelled blood in the water and created push-button AI tools to sell the illusion of instant expertise to underqualified inspectors. What these software companies fail to mention in their flashy marketing materials is that today’s artificial intelligence models are absolute hot garbage when asked direct questions about specific building code citations.
If you interrogate an AI model with direct questions about the International Residential Code, it will confidently cite nonexistent code sections, hallucinate requirements from code books that do not exist, and mix up electrical grounding rules with plumbing vent ratios without missing a beat. Building code compliance is a complex science involving structural load paths, continuous tie-down systems, regional municipal amendments, and manufacturer installation specifications that hold legal weight under IRC § R102.4—none of which can be comprehended by a pattern-matching algorithm guessing pixel clusters.
When AI software takes a photo of an electrical panel or gas line, it simply generates impressive-sounding text, handing the inspector a made-up code section to stick in their official document. This creates a false sense of authority for the buyer while laying the groundwork for total failure.
Anatomy of a Hallucination: How AI Discredits Your Report
- The AI Claim in Report: “2018 IRC § R702.13.7 — Fireblocking required in concealed spaces behind drywall.”
- The Builder’s Response: “IRC Section R702 ends at R702.7. Section R702.13.7 doesn’t exist anywhere in the codebook. Your inspector made this up, so we are rejecting this entire report.”
- The Code Reality: Fireblocking requirements are actually governed by IRC § R302.11. Because the app hallucinated a fake section number, a genuine fire hazard gets completely ignored, and the builder walks away clean.
Why Builders Are Laughing Their Way to the Bank
If you are buying a multi-hundred-thousand (or multimillion) dollar new home, you might feel warm and fuzzy receiving a sixty-page inspection report jammed full of AI-generated code citations. However, to a volume homebuilder, that report is the best news they could possibly receive.
When a builder’s jobsite superintendent gets handed an inspection report produced by a phone app, they do not panic or call out trades to fix structural defects. They gather the crew, point at the page, and wipe tears of laughter from their eyes.
Because the AI model inevitably invents wrong code citations, misidentifies mechanical equipment, and makes wildly incorrect technical assertions, the builder instantly seizes on those glaring errors to demolish the inspector’s credibility in front of the buyer. The superintendent points to the hallucinated code reference, tells the buyer that their inspector clearly has no idea what they are talking about, and uses that single mistake to justify throwing the entire report directly into the dumpster.
By relying on push-button software to act like code gurus, lazy inspectors give bad builders the ultimate get-out-of-jail-free card. This allows serious framing, plumbing, and electrical hazards to get buried behind drywall forever.
Real Code Authority vs. Smartphone Button-Pushers
Snapping photos with a smartphone and tapping a screen is not an inspection, no matter how much money software companies charge for their subscriptions. An app can take a picture of a breaker panel, but it takes an ICC-certified combination building inspector—someone who has spent years buried in code books, passing brutal national examinations, and working actual construction—to know if the overcurrent protection matches the conductor gauge, if the neutral and ground buses are properly isolated, or if the arc-fault breakers match the exact code edition enforced by that specific municipality.
Artificial intelligence doesn’t know construction, doesn’t understand physical reality, and cannot smell gas leaks, feel loose subfloors, measure drain slopes, or spot improper HVAC ducting. When home inspectors let an app dictate their technical findings, they aren’t performing a professional service, but rather executing a lazy performance art piece that exchanges buyer money for empty digital fluff.
The Homebuyer’s Battle-Test Checklist
The real estate industry loves AI inspection software because it is fast, cheap, and completely frictionless, producing pretty PDF reports that never dare to disrupt a closing date or threaten an agent’s commission check. If you are preparing to buy a new home, you need to stop falling for glossy software templates and start interrogating the actual human holding the flashlight.
Before hiring any inspector, put them through this three-part battle test:
- Do you have hands-on, ground-up construction experience?
- Red Flag: “I’m licensed by the state.” (State licensing explicitly requires zero actual build experience).
- Do you hold individual ICC certifications in building, electrical, mechanical, and plumbing codes (or an ICC Residential Combination Inspector R-5 designation)?
- Red Flag: “State regulations don’t require code certifications.” (Precisely why bad builders love state-licensed inspectors).
- Does your software use AI to auto-generate defect notes or building code citations?
- Red Flag: “Yes, it helps write code references automatically.” (Guarantees the report will contain hallucinations builders can use to dismiss it).
If an inspector admits to using artificial intelligence for technical findings or relies solely on a basic real estate license that exempts them from knowing the code, run away immediately. Hire a real code authority who will write a report so technically airtight that no builder can ever laugh it off.

Recall Overview
- Affected Brands: Louisville, Featherlite, Lite, and Century attic ladders.
- Identifying Mechanism: Aluminum or wood folding ladders equipped specifically with gas struts rather than traditional side springs.
- Units Impacted: Approximately 1,770,000 sold in the U.S. (and 13,054 in Canada).
- Retail Availability: Sold nationwide at Home Depot, Lowe’s, Do It Best, Orgill, and online at Amazon.com from November 2012 through July 2026 for $170 to $600.
The Failure Hazard The spreader bolts on these ladder mechanisms can break while in use, causing the ladder structure to fail abruptly under weight. The manufacturer has already received 11 reports of broken bolts, including at least one incident resulting in severe neck, head, and back injuries.
How to Check Your Attic Ladder To check if your home has an affected unit, pull down the attic door and inspect the product label on the inside surface of the door panel. You will find the brand name and model number printed there. Recalled models fit ceiling heights ranging from 7’8″ to 12′ and come in frame sizes of 22.5″, 25.5″, or 30.0″ wide by 54″ or 60″ long.
Required Action Stop using the attic ladder immediately—do not climb it or load items into the attic until it is repaired.
You can register for a free repair kit by visiting Atticstairwayrecall.expertinquiry.com or calling Louisville Ladder toll-free at 888-679-5132 (Monday through Friday, 8 a.m. to 5 p.m. ET). Once registered with your model number, the company will send a free kit containing two replacement ¼-inch spreader bolts, lock nuts, washers, and installation instructions.
Checking your attic door label takes less than two minutes and could prevent a catastrophic fall.


